
Critical Warning Signs That Require Professional Electrical Repairs
Reliable electrical repairs require promptly recognizing warning signs, safely isolating circuit power at the breaker, and engaging licensed contractors for complex distribution and panel faults. Identifying physical symptoms early prevents dangerous arcing, component degradation, and structural fires.
Electrical infrastructure rarely fails without offering a few distinct sensory warnings. Because current moving through wires generates thermal energy, any disruption in conductivity produces heat, mechanical vibration, or ionization of surrounding air.
When an electrical circuit encounters resistance—often due to loose terminal screws, corroded copper conductors, or undersized wiring—energy transforms directly into heat. If a wall switch plate or outlet cover feels noticeably warm to the touch, or if you spot yellowing, browning, or scorched plastic around plug slots, stop using that receptacle immediately.
Similarly, an audible buzzing, humming, or crackling noise from a panelboard or wall switch indicates micro-arcing. Electricity is actively leaping across microscopic air gaps between loose metal contacts or passing through a failing mechanical breaker.
You should treat the following electrical warning signs as critical hazards requiring prompt disconnection and assessment:
- Persistent burning smells: An acrid, fishy, or melting plastic odor around receptacles, switches, or service panels points directly to overheated insulation.
- Visible sparks or flashes: Plug insertion should never produce heavy sparks; visible arcing indicates loose internal contact jaws or an immediate short circuit.
- Physical looseness of plugs: Receptacles that fail to grip plug prongs firmly generate high contact resistance, creating concentrated hotspots inside wall cavities.
- Ungrounded two-prong receptacles: Aging outlets lacking a dedicated equipment grounding conductor leave modern electronics vulnerable and increase personal shock risks.
- Localized or room-specific blackouts: When a single area loses power while the rest of the building runs normally, an upstream branch failure or compromised junction is often responsible.
Diagnosing Persistent Circuit Breaker Trips and Power Failures
A circuit breaker serves as an automated safety valve designed to cut electrical current before wiring reaches temperatures that melt insulation. Understanding why a breaker opens requires looking at branch circuit physics.
In residential and light commercial settings, branch circuits operate at 120 volts with either 15-amp or 20-amp overcurrent protection. Standard electrical engineering practices limit continuous loads—appliances operating for three hours or more—to 80% of maximum circuit capacity. That translates to 1,440 watts on a 15-amp circuit (1,800 watts total maximum) and 1,920 watts on a 20-amp line (2,400 watts total maximum).
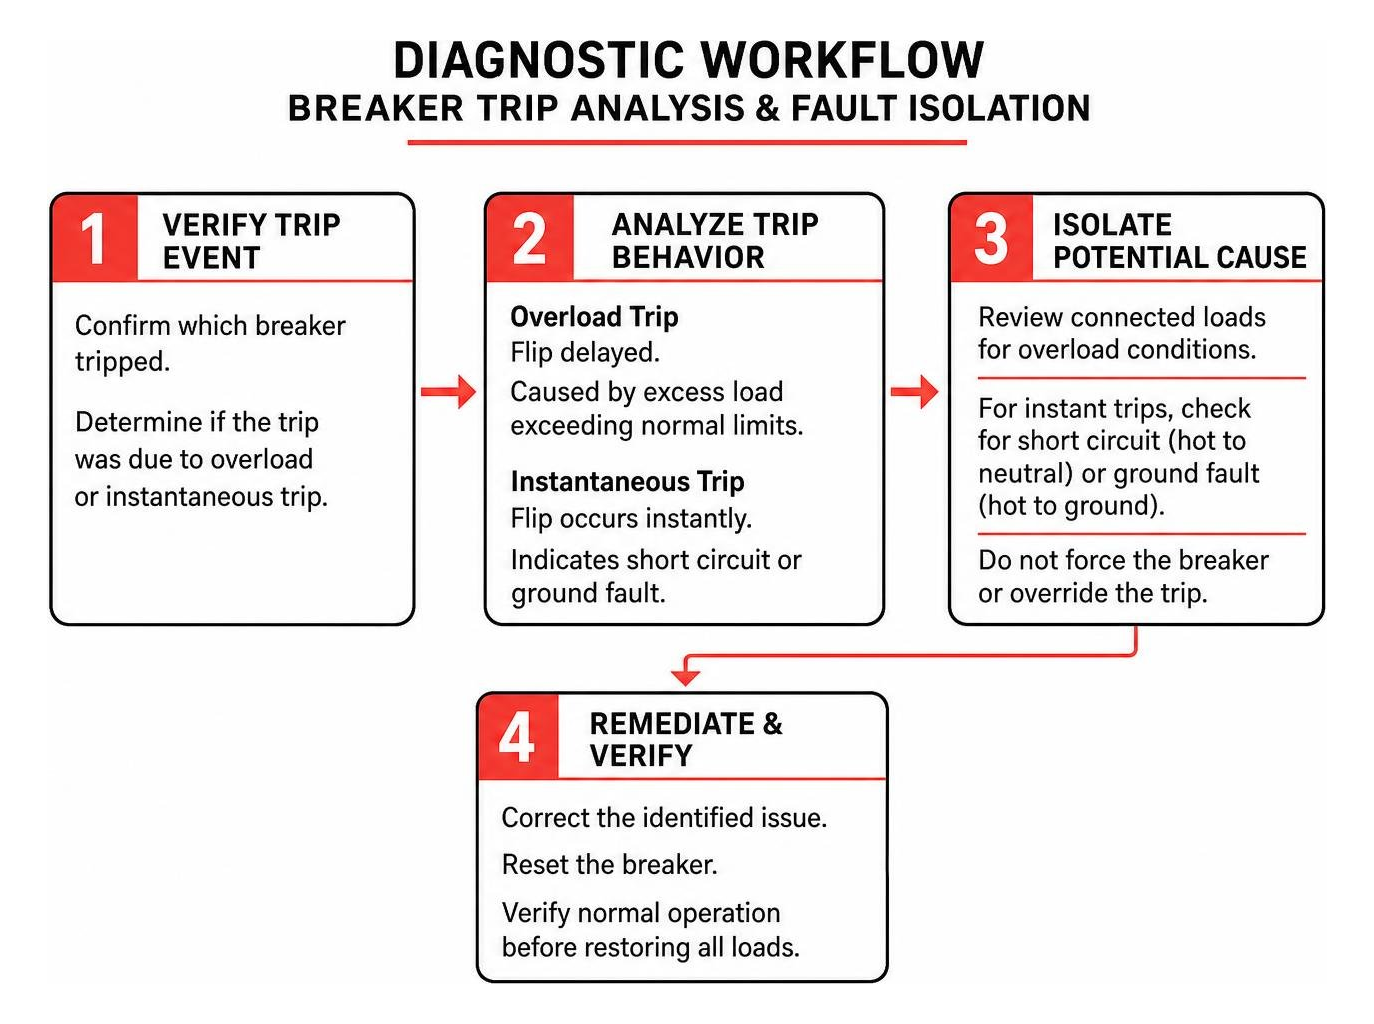
When high-wattage equipment like a 1,000-watt appliance runs alongside motor compressors drawing substantial inrush currents, total draw can easily exceed normal limits, resulting in an overload trip.
However, if a breaker trips instantly upon resetting, you are not dealing with a simple overload. An instantaneous trip signals an active short circuit (a hot conductor contacting a neutral conductor) or a ground fault (a hot conductor touching a grounded metal frame or bare copper ground wire). Forcing a breaker handle to stay on when it refuses to reset overrides its internal trip-free mechanism and introduces severe electrical fire hazards.
Unsafe Switches and Outlets Needing Immediate Electrical Repairs
Receptacles endure substantial mechanical wear every time cords are plugged in and removed. Over years of operation, internal brass and copper contact blades lose their mechanical spring tension. When prongs sit loosely inside an outlet, the reduced surface contact area forces current through a bottleneck, generating localized thermal spikes that degrade surrounding insulation.
In buildings constructed between the mid-1960s and late 1970s, branch circuits often contain solid aluminum wiring. Aluminum expands and contracts at significantly higher rates than copper under electrical load cycles. This phenomenon, known as thermal creep, slowly loosens terminal connections over time, introducing oxidation and high resistance.
Similarly, Ground-Fault Circuit Interrupter (GFCI) outlets contain sensitive internal sensing electronics that degrade after years of line surges. If pressing the built-in test button fails to cut power, or if the unit refuses to latch during a reset, internal ground-fault protection is compromised.
Essential Safety Protocols and DIY vs. Professional Boundaries
Safe electrical troubleshooting demands strict procedural discipline. Electricity flows along all available conductive paths to reach ground, meaning human contact with an energized conductor turns the body into a path for dangerous current.
When addressing simple maintenance tasks, safety protocols start by cutting circuit power at the main distribution panel. Electricians rely on visual lock-out/tag-out practices: applying a physical lockout clasp or placing brightly colored electrical tape with a clear warning notice over the tripped or opened breaker handle to prevent accidental re-energization by other building occupants.
Never trust a wall switch or a labeled breaker directory alone. Always verify de-energization using a certified non-contact voltage tester or a digital multimeter calibrated for AC voltage. Test the meter on a known live circuit first to ensure the tool operates correctly, test the target circuit wires, and re-test the live source afterward.
Basic DIY Maintenance and Safe Receptacle Replacement
Property owners equipped with proper tools can safely replace worn standard receptacles, provided circuit de-energization is verified. Always use insulated hand tools rated for electrical work and wear safety glasses to guard against debris inside electrical boxes.
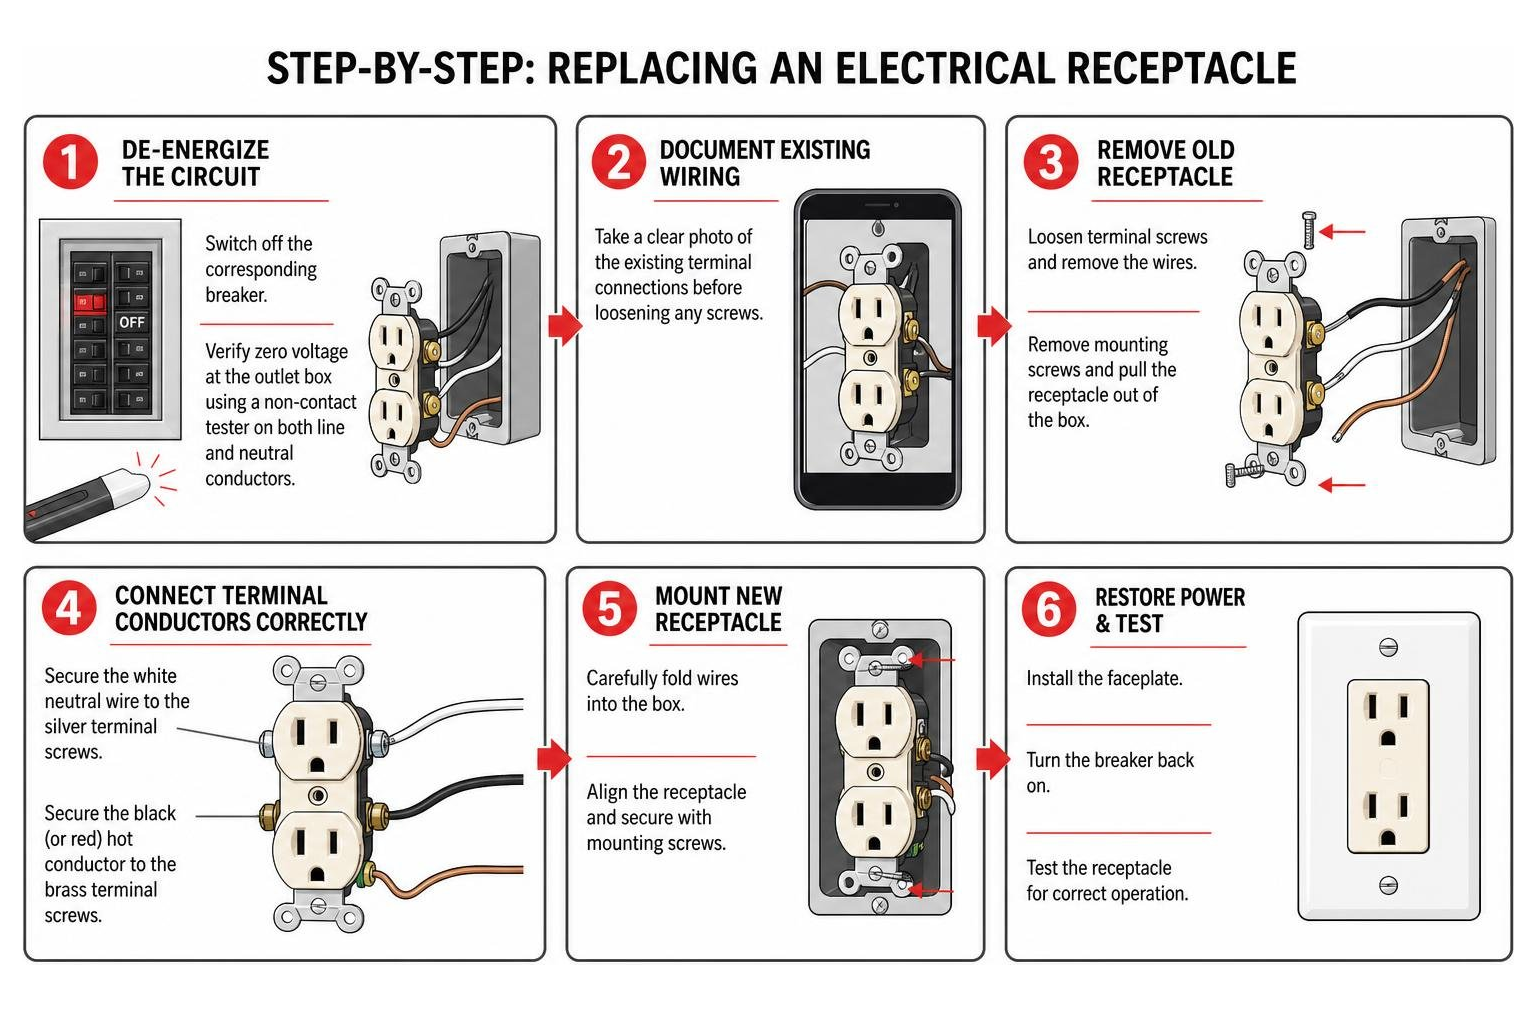
To replace an outlet safely:
- De-energize the circuit: Switch off the corresponding breaker and verify zero voltage at the outlet box using a non-contact tester on both line and neutral conductors.
- Document existing wiring: Take a clear photo of the existing terminal connections before loosening any screws.
- Connect terminal conductors correctly: Secure the white neutral wire to the silver terminal screws and the black (or red) hot conductor to the brass terminal screws.
- Loop conductors clockwise: Form exposed conductor ends into a 3/4-turn loop and hook them clockwise around terminal screws. As the screw tightens, the rotational force pulls the wire loop securely closed rather than pushing it outward.
- Establish grounding continuity: Connect the bare copper or green insulated equipment grounding conductor firmly to the green ground screw on the receptacle chassis, as well as to the metal junction box if applicable.
- Reinstall cleanly: Fold insulated wires accordion-style into the junction box to prevent bare copper from pinching against metal box edges or mounting screws.
When to Call a Certified Contractor for Complex Electrical Repairs
While like-for-like receptacle replacement is manageable for experienced property owners, high-voltage components and main service distribution require an experienced professional. Specialized diagnostic tools, including thermal imaging cameras and insulation resistance testers, are essential for identifying hidden faults behind finished walls and within distribution switchgear.
A master electrician or licensed electrical contractor should always be hired for:
- Replacing or reconfiguring main electrical panels, subpanels, and busbar assemblies.
- Diagnosing recurring neutral dropouts, phase imbalances, or high harmonic distortions.
- Remediating vintage aluminum branch wiring using specialized mechanical connectors.
- Sizing and running dedicated 240-volt appliance circuits, commercial equipment drops, and EV charging infrastructure.
- Restoring electrical service after structural fires, flood inundation, or major storms.
- Navigating Electrical Code Compliance Inspection Rules and Permits during extensive property renovations or commercial tenant buildouts.
Post-Storm Diagnostics and Electrical Service Alterations
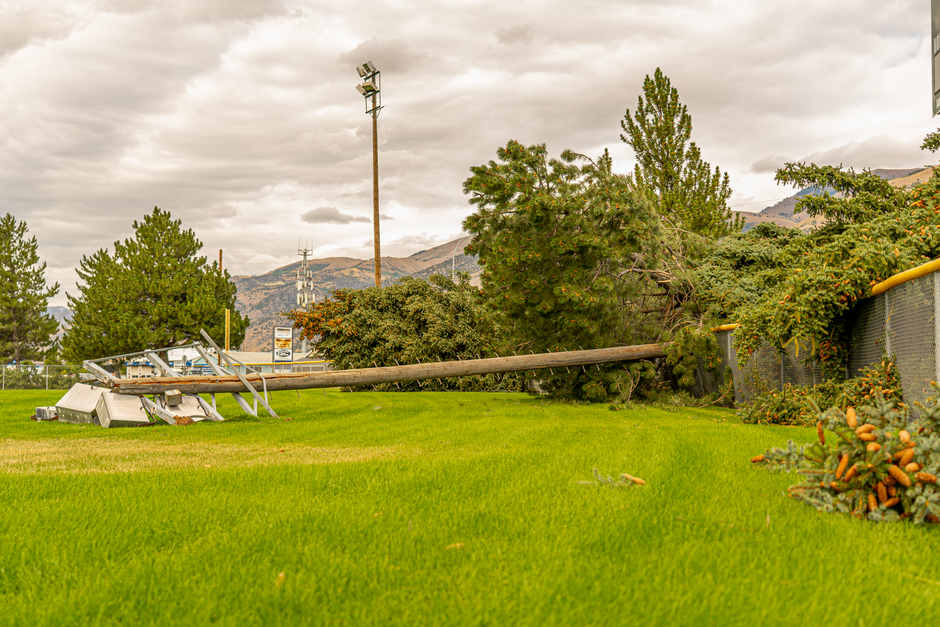
Severe weather events introduce massive physical stresses to overhead and underground electrical infrastructure. High-velocity winds, falling tree limbs, and driving rain commonly tear overhead utility lines directly away from building exteriors.
When inspecting exterior storm damage, safety depends on understanding the division between utility equipment and customer-owned infrastructure. The utility company owns and repairs the overhead service drop wires running from the street transformer to the building connection point. However, the building owner is financially and legally responsible for the weatherhead, the rigid conduit service mast, structural guy-wire supports, the meter socket base, and the main entrance conductors leading indoors.
| Electrical Component | Responsible Entity | Repair and Permitting Requirements |
|---|---|---|
| Overhead Service Drop Lines | Local Utility Provider | Utility work crews; no municipal building permit required from property owner |
| Service Weatherhead & Mast | Property Owner | Licensed electrical contractor required; municipal electrical repair permit mandatory |
| Guy-Wires & Structural Anchors | Property Owner | Structural fastening to building framing members; contractor installation |
| Electric Meter Unit Glass/Mechanism | Local Utility Provider | Utility-owned revenue meter; replaced by power company field technicians |
| Meter Base Socket & Enclosure | Property Owner | Licensed electrician repair; subject to local electrical code inspection before utility reconnect |
| Main Interior Service Panel | Property Owner | Master electrician permit; code-mandated safety upgrades often triggered |
If winds bend the exterior service mast, the conduit must be rebuilt and secured with dual guy-wires anchored into solid wall studs or structural roof rafters to withstand future line tension.
Navigating Permits, IRC Codes, and Service Alterations
Building codes establish a clear legal distinction between basic maintenance repairs and service alterations. Under the International Residential Code (IRC) and National Electrical Code (NEC), simple like-for-like repairs—such as swapping a single standard 15-amp branch circuit breaker with an identical unit in the exact same panel slot—generally do not require municipal permits.
However, an electrical service alteration—such as upgrading service capacity from 100 amps to 200 amps or replacing an entire distribution panelboard—legally requires a permit pulled by a licensed Master Electrician.
Service alterations frequently trigger secondary life-safety upgrades under modern building codes:
- Interconnected smoke alarms: Hardwired smoke alarms powered directly by the building’s electrical system with battery backups must be installed in every sleeping room, immediately outside sleeping areas, and on every habitable story.
- Carbon monoxide protection: Interconnected CO detectors must be installed outside sleeping areas and on levels containing fuel-burning appliances or attached garages.
- GFCI and AFCI retrofits: Kitchen countertop outlets, bathrooms, laundry rooms, and exterior receptacles must be brought up to modern GFCI protection standards.
Critically, when a service panel replacement is undertaken solely to replace historically hazardous or damaged panel brands, building departments generally do not mandate full-house rewiring, provided the existing branch circuits remain safe and functional.
Specialized Applications: RV Dual-Voltage and Hospitality Systems
Electrical systems extend beyond traditional residential drywall framing. Recreational vehicles (RVs) and mobile commercial units operate hybrid electrical systems combining low-voltage 12-volt Direct Current (DC) battery systems with 120-volt Alternating Current (AC) distribution fed through onboard inverters, generators, or shore power drops.
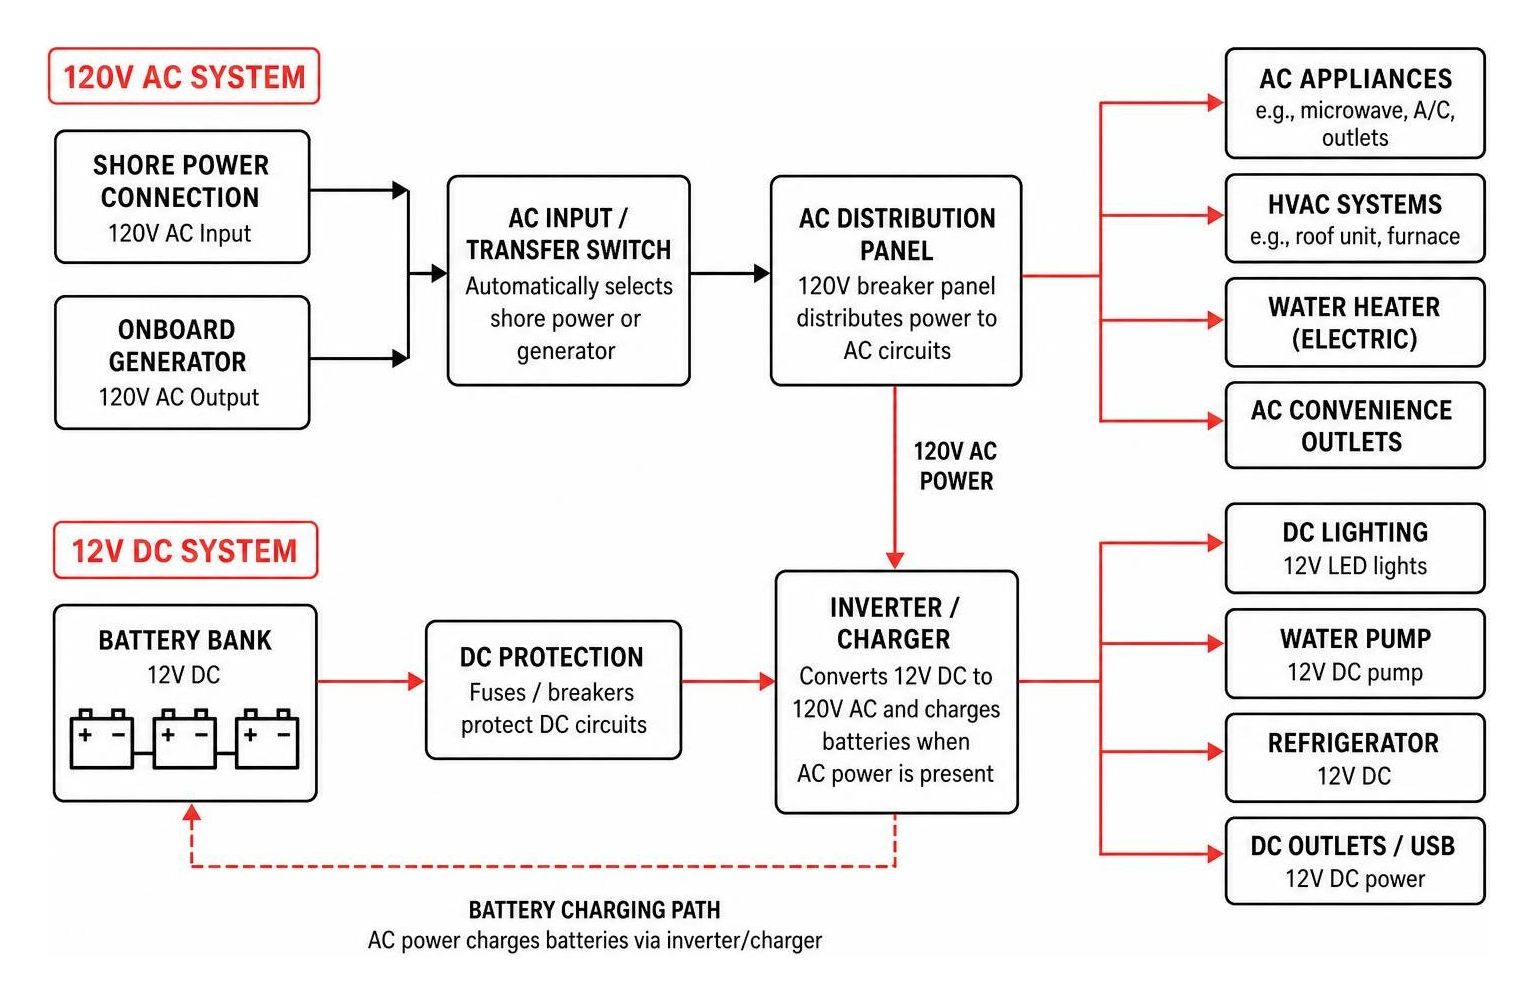
Mobile systems suffer unique failure modes caused by continuous road vibration, which slowly works terminal screws and wirenuts loose. DC converter failures, damaged inverter transfer switches, and deep battery discharge cycles frequently disrupt power to appliances and water pumps.
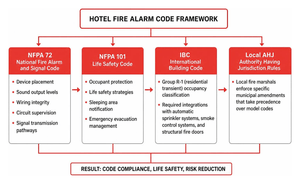
In commercial environments, understanding how to choose hospitality electrical services without shocking your budget ensures continuous guest satisfaction and life-safety system reliability. Commercial properties benefit from structured electrical maintenance plans that schedule regular thermal imaging scans of switchgear, load-balance three-phase circuits, and inspect central emergency lighting systems before costly outages occur.
Frequently Asked Questions About Common Electrical Issues
Why do my lights dim or flicker when major appliances cycle on?
When large inductive loads—such as an air conditioner compressor, commercial refrigeration unit, or heat pump—cycle on, their electric motors require an initial surge of current known as inrush current or locked-rotor amperage. This startup surge can draw four to six times the appliance’s normal operating current for several fractions of a second.
This brief, heavy current draw creates a momentary voltage drop across the electrical system. If lights dim briefly (for less than a second) and immediately return to full brightness, this is generally a normal physical response to a heavy motor starting up on a shared feeder.
However, if light fixtures flicker continuously, oscillate in brightness, or dim across multiple independent rooms, it points to systemic issues:
- An undersized main electrical service panel unable to accommodate modern electrical demands.
- A loose or corroding neutral conductor connection at the service mast or main panelboard.
- High electrical resistance along older branch circuit splices.
- Imbalanced phase loading across a split-phase 120/240-volt or three-phase distribution system.
What is the safest way to reset a circuit breaker that will not stay on?
If a circuit breaker trips and immediately snaps back to the middle trip position when you attempt to reset it, do not force the handle into the “ON” position. Breakers contain internal mechanical trip levers designed to open the circuit even if the exterior switch handle is held down.
To safely troubleshoot a tripped circuit breaker:
- Unplug downstream devices: Disconnect high-draw appliances, electronics, and lighting fixtures connected to the dead circuit.
- Execute a complete reset cycle: Push the breaker handle firmly into the “OFF” position until you feel and hear a distinct mechanical click. Then, push the switch smoothly to the “ON” position.
- Isolate an overload vs. a fault: If the breaker holds with appliances disconnected, plug equipment back in one at a time. If the breaker trips immediately upon connecting a specific appliance, that device is internally shorted.
- Identify wiring faults: If the breaker trips instantly with nothing plugged in, a short circuit or ground fault exists inside the branch wiring, a switch box, or the breaker itself. Leave the breaker in the “OFF” position and call a licensed professional.
Are electrical protection plans and service warranties worth the cost?
Home and commercial electrical protection plans provide recurring repair coverage for standard wear-and-tear component failures, typically costing a small monthly fee through utility bills or third-party home warranty providers.
These programs can offset out-of-pocket costs for minor repairs, such as replacing failed GFCI receptacles, wall switches, and standard branch circuit breakers. However, property owners should review program terms carefully.
Many standard protection plans impose strict annual claim caps (such as $500 per calendar year), enforce mandatory waiting periods (often four to six weeks post-enrollment) before claims can be filed, and deduct mandatory municipal permitting and inspection fees directly from the total payout allowance.
Furthermore, full panel replacements, pre-existing wiring defects, vintage aluminum rewiring, and major storm damage repairs are commonly excluded. For comprehensive risk mitigation, a direct relationship with a trusted electrical contractor offering transparent estimates and preventative maintenance reviews is far more reliable.
Reliable Infrastructure Begins With Code-Compliant Electrical Care
A building’s electrical system serves as its central nervous system, quietly powering essential equipment, lighting, climate controls, and life-safety devices every minute of the day. Neglecting early warning signs—such as a warm faceplate, an intermittent flicker, or a humming breaker—transforms minor, inexpensive maintenance tasks into significant safety and operational hazards.
Whether you are managing a commercial facility, overseeing a multifamily property, or maintaining a home, prioritize safety above all else. For fast, code-compliant, and durable power solutions across Jacksonville, FL and the Southeast U.S., partner with our experienced team for trusted electrical services that keep your property running smoothly and securely.